Applied type
Described below is the examples of patterns used frequently in the actual work, which use document registration, collaboration, loop, function, and so on.
In addition, the procedure to use the exiting Workflow settings using the import function and the clipboard is described.
Scenario of This Workflow
This is an example of the Workflow to create and approve the contract.
Sales personnel A of the Company XX creates the contract draft.
Next, exchange opinions on the provisions of the contract draft with the legal personnel B in CollaboSpace.
A creates the contract that the results are applied and submits it to the Sales Dept. Manager C who is his superior.
C checks the contract received from A, and if there is any problem, send it back to A.
For the approved contract, set the approval date automatically in the Workflow.
When the contract is approved, store the approved contract in the [Contract-related] folder of DocumentSpace. Report the Sales Dept. Manager C by mail that the contract was stored as well as the approval date.
The flow of this scenario is as follows:
Operation
- [Contract Draft] Assignee: Sales personnel A
Create the contract draft.
- [Legal Check] Assignee: Sales personnel A
Request the provision check of the contract to the legal personnel B in CollaboSpace.
- [Contract Finalization] Assignee: Sales personnel A
Apply the check results to FIX the contract.
- [Approval] Assignee: Sales Dept. Manager C
Check the contract and it is approved in case of [Approved]. In case of [Not Approved], it is sent back to the sales personnel A.
- The [Set Approval Date] system is automatically performed.
When it is approved, the approval date is automatically set.
- [Register Document] assignee: Sales personnel A
Register the contract after approval.
- The [Registration Notification] system is automatically performed.
Notify the Sales Dept. Manager C by mail that the contract has been registered.
Configuration of This Workflow Definition

Creating Workflow Definition
Described below is how to create a Workflow definition.
The user performing the workflow activity here needs to be authorized as a definition creator.
Operation
- Perform step 1 to step 6 of Creating Workflow Definition in the topic "Basic Type" described above.
The [Create Workflow Definition] window appears.
- In [Definition Name], enter the name of the Workflow definition to be created. Next, click [Create].
The [Edit Workflow Definition] window appears.
- Settings
Definition Name: Workflow: Applied type
- Click [Import].
The [Definition Import] window appears.
- Click [Read-only] of [Definition File].
The [Choose File] dialog box appears.
- Specify the location where the export file of the "Workflow: Basic Type" is saved. Select "Workflow: Basic Type.xml" and click [Open].
You will go back to the [Definition Import] window.
When the [Delete resources before importing definition.] checkbox is marked and import is performed, the information on the assignees and responsibles set in [Workflow: Basic Type] is deleted.
- Click [Import].
Displays the confirmation dialog box.
- Click the [OK] button.
The [Edit Workflow Definition] window appears.
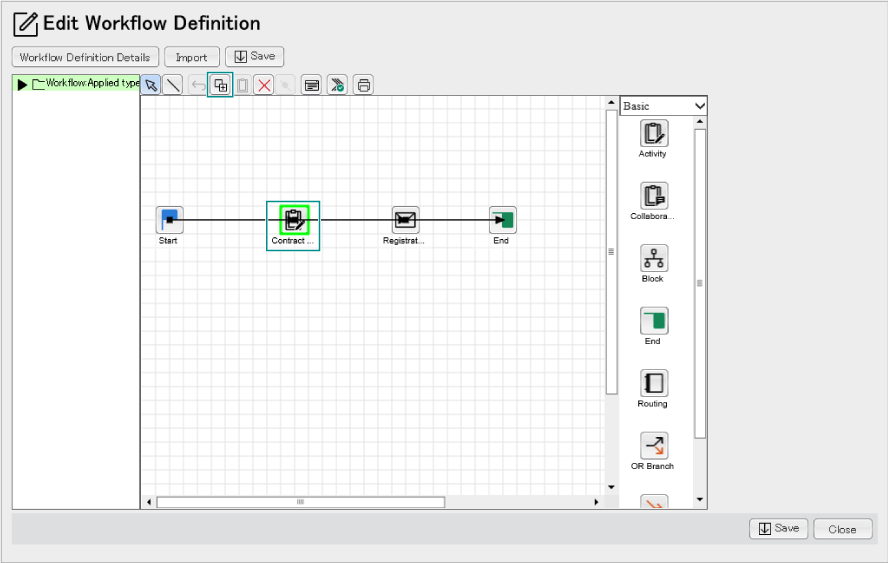
- Copy [Contract Draft] to the clipboard.
Select [Contract Draft] in the Draw area of the [Edit Workflow Definition] window and click  ([Copy] icon) in the [Editing Buttons] area.
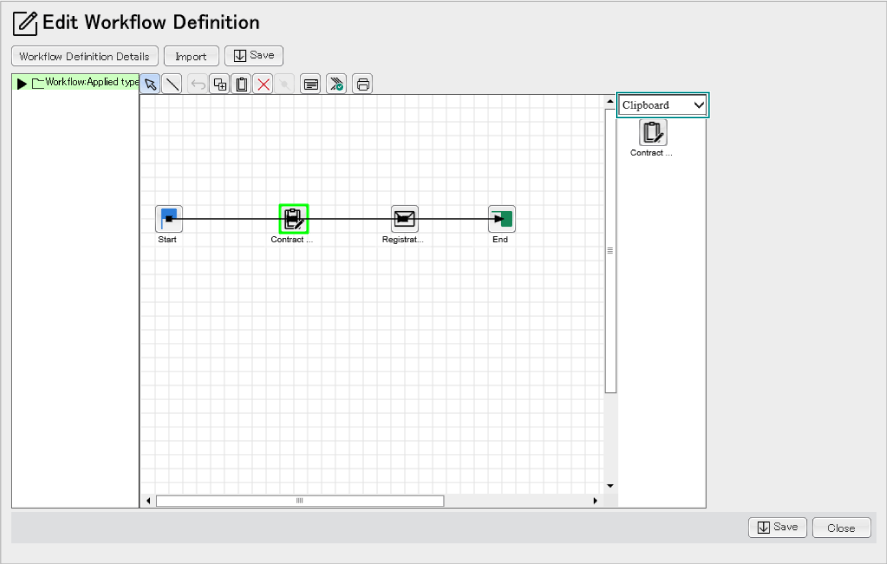
- Select [Clipboard] from the selecting items of the [Activity] area.
Displays [Contact Draft] copied in the step 8.
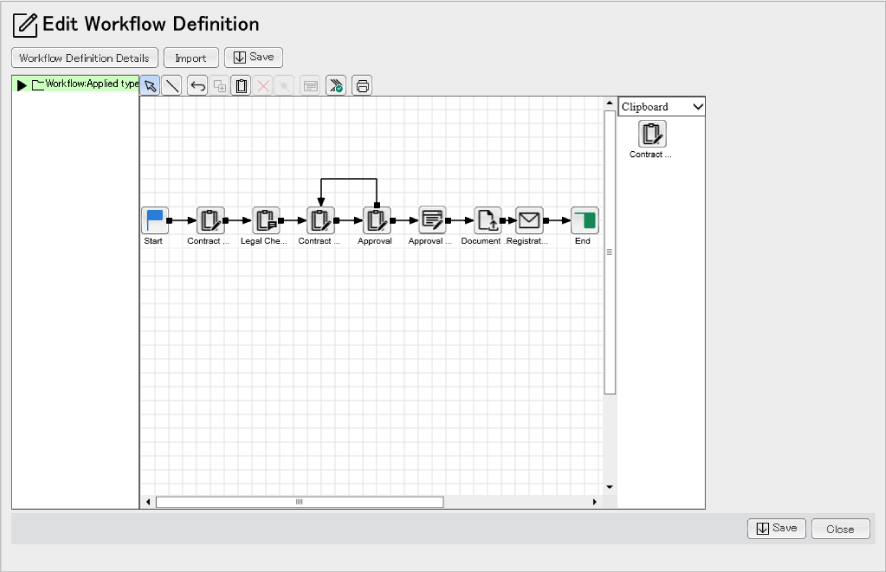
- Place the icons other than [Contract Draft] and [Registration Notification] as shown in this Workflow Definition configuration.
To draw a line from [Approve] to [Contract Finalization], use the ([Add Node] icon).
- Delete the line between [Contract Draft] and [Registration Notification] and adjust the position so that five icons are placed on the right of the contract draft.
- Drag and drop the [Basic] > [Collaboration] icon and change the name to [Legal Check].
- Drag and drop [Clipboard] > [Contract Draft] in the Draw area and change the name to [Contract Finalization].
- Drag and drop [Clipboard] > [Contract Draft] in the Draw area and change the name to [Approval] .
- Drag and drop the [Application] > [Attribute Settings] icon in the Draw area and change the name to [Approval Date Setting].
- Drag and drop the [Document Operation] > [Document Registration] icon in the Draw area and change the name to [Document Storage].
- Connect between icons with a line.
- Refer to the step 19 to the step 20 of "Creating Workflow Definition" in the topic "Basic Type" and specify the assignee, the responsible, and the task space to be used to the following activities.
- Approval
Specify the Sales Dept. Manager C as the assignee.
- Legal check
Specify the Task Space in the CollaboSpace as the assignee's task.
The task space to be specified needs to be created in advance.
For details on how to create the Task Place ➯ <CollaboSpace Help>
- Click [Select Task] of [Basic Attributes].
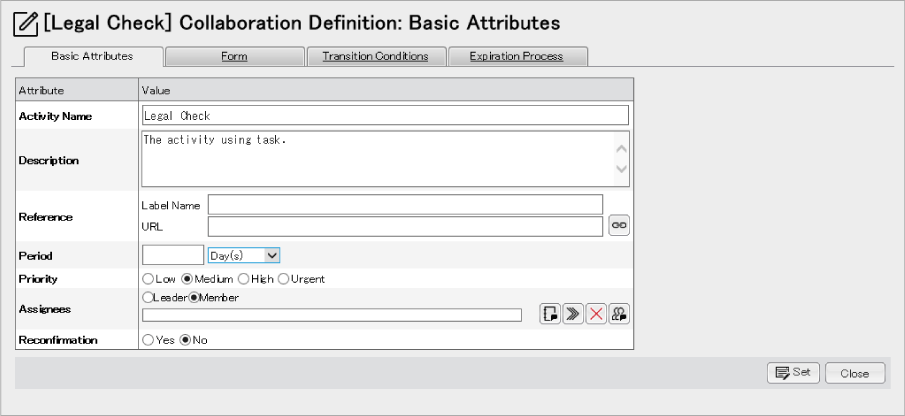
- Search the CollaboSpace for the legal check. Enter the value to be searched in [Task Name] or [Task ID]. ([Task Name] is used in this example.)
- Select the task to be added and click [Add].
- Click [Set] in the [Legal Check] window.
- Approval Date Setting
Specify the Sales Dept. Manager C as the assignee and the responsible.
- Document Registration
Specify the sales personnel A as the assignee and the Sales Dept. Manager C as the responsible.
- Create the user-defined attribute.
Select [Contract Draft] and create the following attributes in the same procedure as the step 21 to the step 23 of Creating Workflow Definition in the topic "Basic Type".
Table: Attributes Created in the User-defined Attributes (1)
| Attribute Value |
Data Type |
Mode |
Others |
| Contract Draft Storage |
Document |
Single-value |
Refet to Setting [Contract Draft Storage] for details. |
| Contract Finalization Storage |
Select [Document]. |
Single-value |
- |
| Approval of the contract |
Select [String]. |
Single-value |
Mark the checkbox of [Set an enumeration value.].
Enter the value to be registered as enumeration ("Approved" and "Not Approved" in this case) in the enter column on the right of [Enumeration]. Then, click the [Add] button to add each value.
Refer to Setting [Approval of the contract] for details. |
| Approval date |
Select [Date and Time]. |
Single-value |
- |
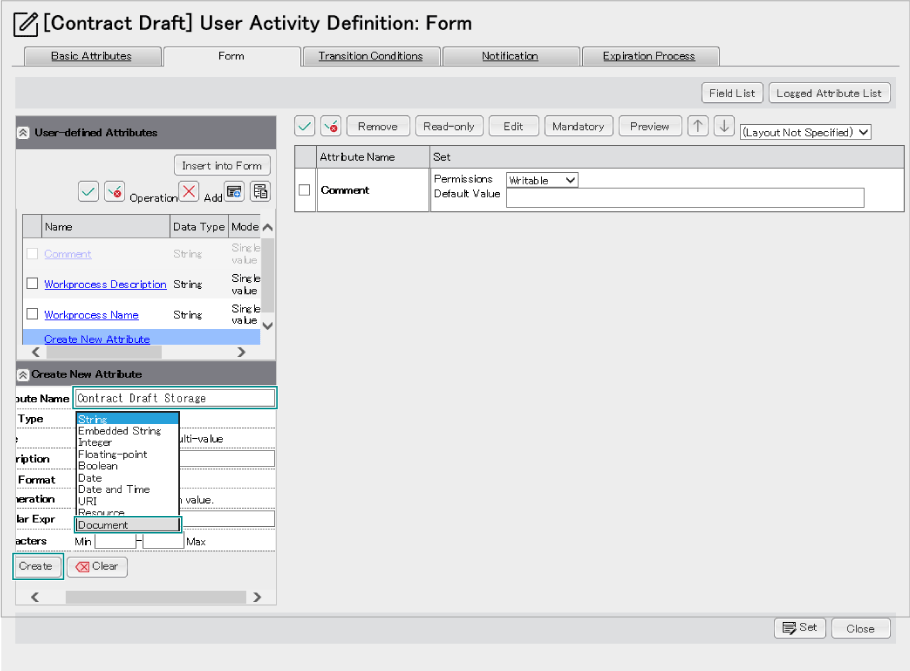
Fig.: [Contract Draft Storage] Setting
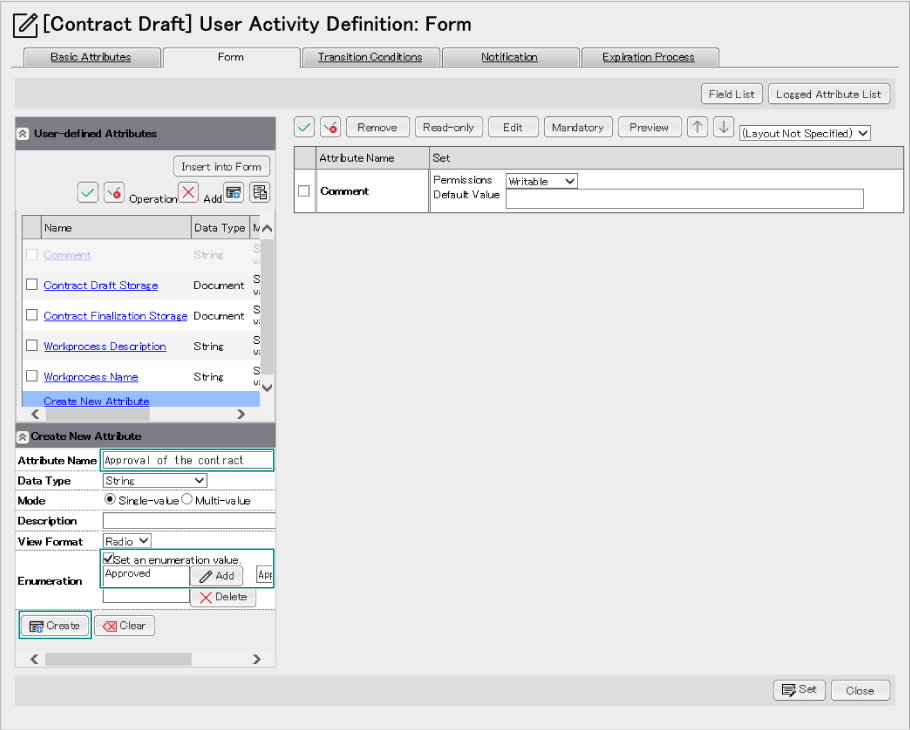
Fig.: [Approval of the contract] Setting
- Use [System Attribute] to create the user-defined attribute.
In the [User-defined Attributes] area, click  ([Add Attributes from the System Attributes.] icon). Next, click the "Description" for the following activities.
- Contract Draft
- Legal check
- Contract Finalization
["Descriptions" of the "Contract Draft"], ["Descriptions" of the "Legal Check"], and ["Descriptions" of the "Contract Finalization"] are added to the [User-defined Attributes] area.
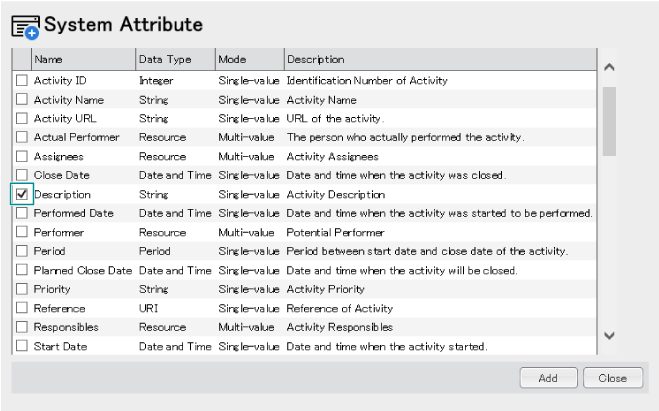
- Set the activity description for the following activities. The attribute created here appears in the form as a [Description] attribute of [Basic Information] set in the step 13 when the activity is started.
Select the [Activity] icon of each activity and click the [Show Details] icon in the [Writable Buttons] area.
- Click the [Basic Attributes] tab. Enter the following details in [Description].
Table: Details Entered in [Description]
| Activity Name |
Details to be Entered |
| Contract Draft |
An activity that the sales personnel A creates the contract draft and stores it in DocumentSpace. |
| Legal check |
A task to exchange views and information on provisions of the contract between the sales personnel A and the legal personnel B. |
| Contract Finalization |
Contract Finalization An activity that the sales personnel A creates the fixed contract again after checking the provisions with the Legal Dept. and stores it in DocumentSpace. |
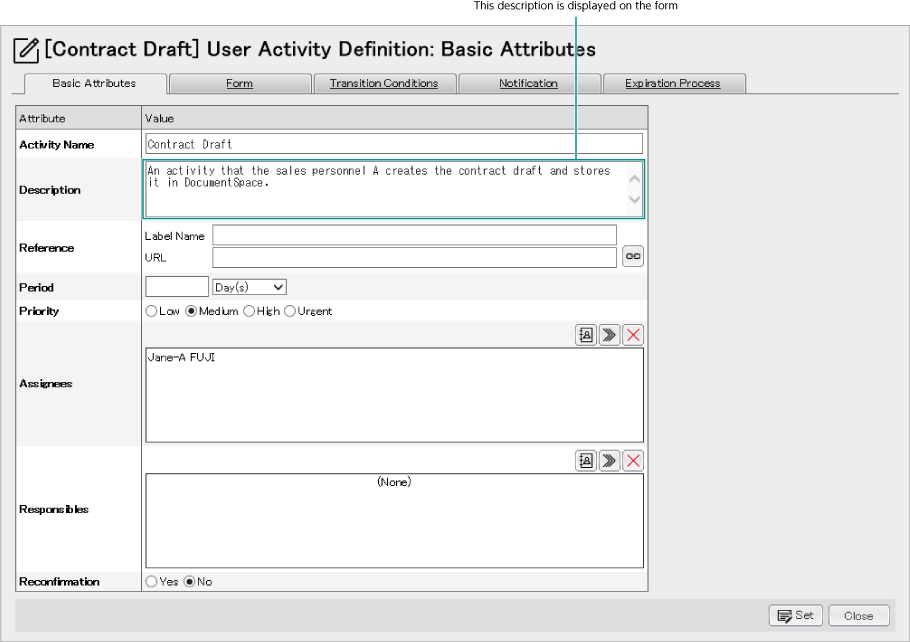
- Add the created User-defined Attributes into the form.
Add the following attributes in the same procedure of the step 24 to the step 26 of Creating Workflow Definition in the topic "Basic Type".
Table: Details Added to the Form
| Activity Name |
Attribute to be Added |
Permission |
Others |
| Contract Draft |
"Description" of the "Contract Draft"
Contract Draft Storage |
Read-only
Mandatory |
- |
| Legal check |
"Description" of "Legal Check" |
Read-only |
|
| Contract Finalization |
"Description" of "Contract Finalization"
Contract Finalization Storage |
Read-only
Mandatory |
- |
| Approval |
Contract Finalization Storage
Approval of the contract |
Read-only
Writable |
-
[Default Value] selects [Approved]. |
- The order of the attributes added to the form can be switched by clicking the [↑] button and the [↓] button.
- The [Comment] attribute is inserted into the activity copied from [Contract Draft]. The later operation will not be affected whether or not the [Comment] attribute is deleted.
- Set the transit conditions for the [Approve] activity in the [Edit Workflow Definition] window.
Select the [Approve] icon and click the [Show Details] icon of the [Editing Buttons] area.
- Click the [Transition Conditions] tab.
Click [Contract Finalization] and [Approval Date Setting] of [Next Activity] in the [Transition Conditions] page displayed.
- Set the following details for two of next activities.
Click the [Set] button after setting is completed.
Table: Transition Condition Settings
| Next Activity |
Transition Name |
Description |
Type |
Condition |
Condition Expression |
| Contract Finalization |
Not approved |
Send it back to the sales personnel A. |
Specify the conditions |
Basic Entry
Click "Add". |
Enter "User-defined Attributes", [Approval of the contract], [=], and [Not Approved] for the value.
|
| Approval date setting |
Approved |
Transition to the approval date setting. |
Default |
- |
- |
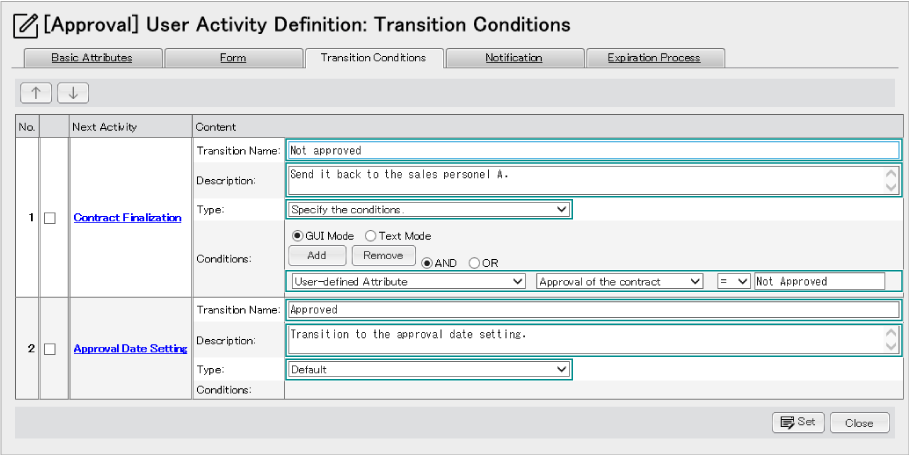
Fig.: Transition Condition Setting
- Specify [Parameters] for [Approval Date Setting] and [Document Registration].
- Setting [Approval Date Setting]
-
- Select the [Approval Date Setting] icon and click the [Show Details] icon of the [Editing Buttons] area.
- Click the [Parameters] tab.
Mark the checkbox of [Approval Date] and click the [Add to Parameters] button in the [User-defined Attributes] area of the [Parameters] tab page displayed.
- Set the value for the parameter inserted.
From the [Specifying Method] drop-down list, select [Expression].
Next, enter "Now()" in [Attribute Value]. Click the [Set] button after entering.
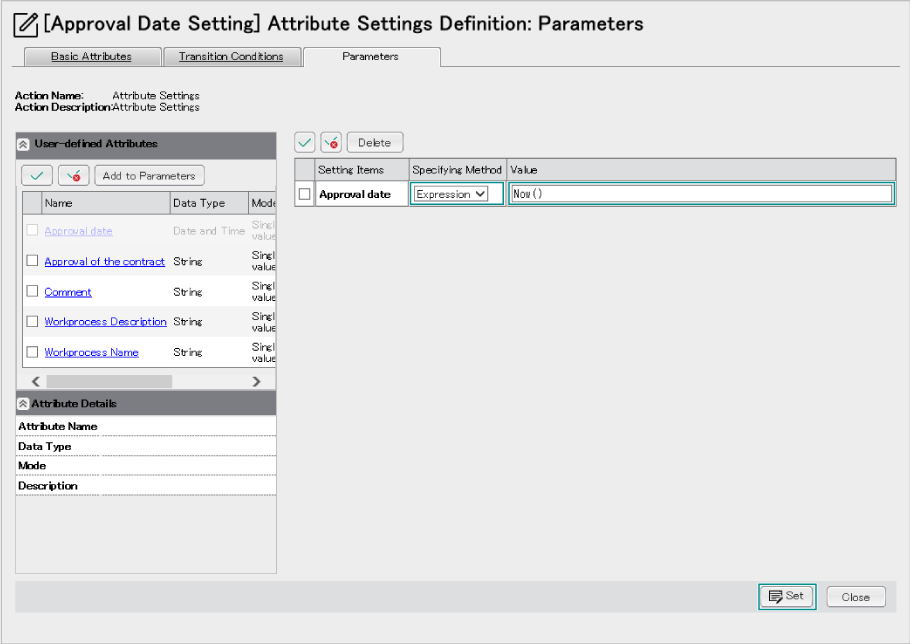
- Setting [Document Registration]
- Select the [Document Registration] icon and click the [Show Details] icon of the [Editing Buttons] area.
- Click the [Parameters] tab.
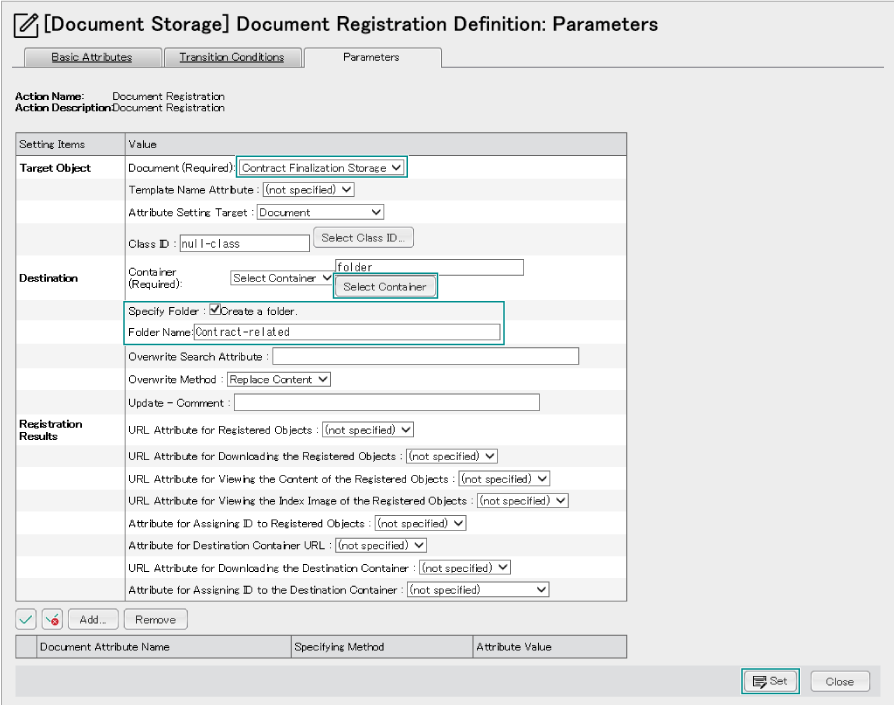
Set the following details in the [Parameters] tab page displayed.
Click the [Set] button after setting is completed.
Table: Parameter Setting of [Document Registration]
| Setting Items |
Value |
| To be Registered |
Document (mandatory)
Value of Template Name Attribute |
Select [Contract Finalization Storage].
(Not specified) |
| Destination |
Container (mandatory)
Specify Folder |
Click the [Select Container] button and specify the drawer or folder of the DocumentSpace.
Select the [Sales Dept] folder here.
Mark the checkbox of [Create a Folder].
Enter [Contract-related] in the [Folder Name]. |
| Registration Result |
Attribute to set the URL of the registered Objects
Attribute to set the URL of the destination container |
(Not specified)
(Not specified) |
| Attribute template |
|
(Not specified) |
Fig.: Parameter Setting of [Document Registration]
- Perform the step 31 to the step 34 of Creating Workflow Definition in the topic "Basic Type".
This terminates creation of the workflow definition.
In this example, the warning appears when the definition check is performed. This always appears when the loop is detected. When any other errors and warnings don't appear, you can complete the activity.
Publishing Workflow
Starting Workflow
Performing Workflow
Operation
- Click the [Activity List] link in the [Workflow Top] window.
The [Activity List] window appears in the lower frame.
- Select the [Assigned] tab, [Delegated] tab, or [Completed] tab depending on the activities to be listed.
The activities corresponding to the selected tab are listed
- In the [Activity List] window, [Workprocess] window, or [Task Place] window of CollaboSpace, click [Contract Draft] or
 ([Show Activity] icon) of [Contract Draft].
The [Form] page of the [Activity] window ([Contract Draft] window in this case) appears.
- The sales personnel A creates the contract draft and saves it in any location.
- Click [Start Activity] in the [Form] page of the [Contract Draft] window.
The folder displayed in the attribute value of the Attribute Name [Contract Draft Storage (mandatory)] changes from [Not available] to [Available].
- Click the folder displayed in the attribute value of the Attribute Name [Contract Draft Storage (mandatory)].
The [Contract Draft Storage] folder of DocumentSpace is open.
- Select [Document Registration] form [Hierarchy Operation] in the [Contract Draft Storage] folder of DocumentSpace.

- Click the [Read-only] button in [Content] of the [Document Registration] window displayed and select the document created in the step 4.
Select and click the [Register] button.
- Confirm the details in the [Confirm Registration] window and click the [Register] button.
Close the [Document Registration Completed] window displayed.
When the system cannot identify the content type of the document, the following confirmation message may appear. "There is a file that the content type cannot be identified. Select the content type."
When the message appears, confirm the content type of the document to be registered and select it from the drop-down list.
- You will go back to the [Form] page in the [Contract Draft] window of Workflow.
Click the [Refresh] button displayed in the attribute value of the Attribute Name [Contract Draft Storage (mandatory)].
Displays the document stored in the step 8.
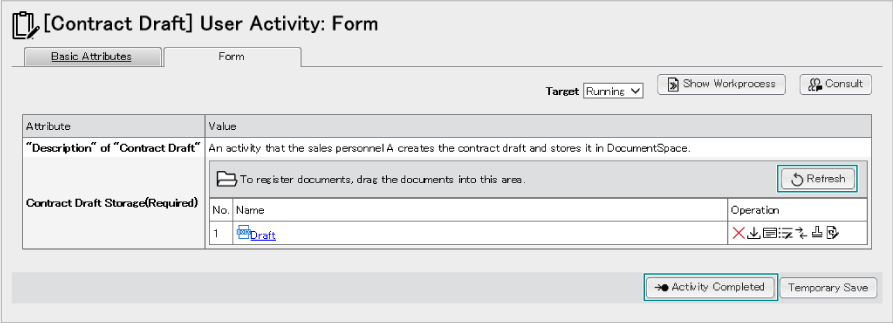
- Click the [Complete Activities] button.
When the [User Confirm] dialog box is displayed
- Enter the user ID in [User ID].
- Enter the password in [Password].
- Click [OK].
After the login succeeds, the [User Activity Completed] window appears. When the login fails, an error message is displayed.
- Click the [Close] button.
- Transit to [Legal Check]. The sales personnel A who is an assignee performs the step 1 and 2.
- Click [Legal Check] as in the step 3. Next, click [Start Activity] in the [Form] page of the [Legal Check] window.
- Click the [Basic Attributes] tab. Click [OK] for the confirmation message displayed.
- Click the URL of the Task Space displayed to the assignee.
The Task Space window for the legal check appears.
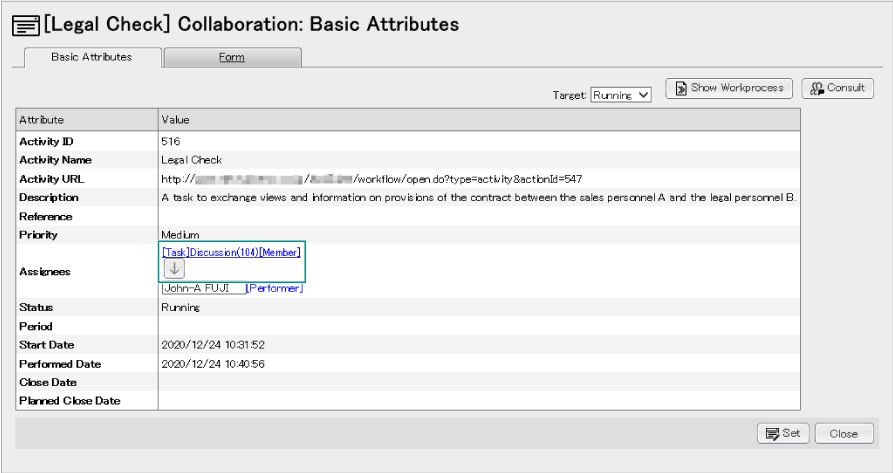
- Exchange opinions with the legal personnel B about the contract created in the step 4.
After consultation with the personnel B in the Legal Affair Dept., go back to the [Legal Check] window of the Workflow and click the [Complete Activities] button in the [Form] page.
- The sales personnel A corrects the contract and saves it in any location.
- Perform the step 5 to the step 11 of [Contract Finalization] in the same way.
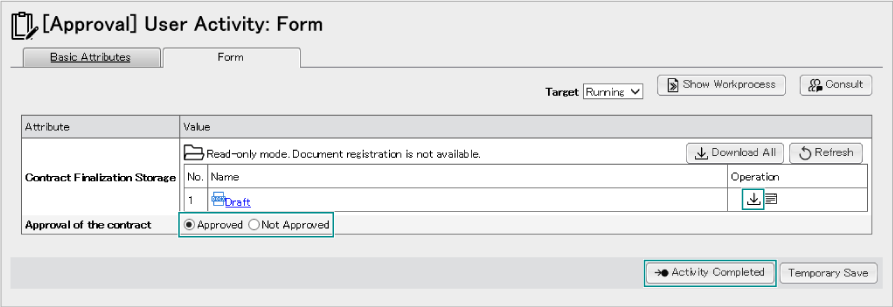
- The Sales Dept. Manager C clicks [Start Activity] in the [Form] page of the [Approval] window.
- Click
 [Download] icon.
The [File Download] dialog box appears.
- Click [Save].
The [Save As] dialog box appears.
- Specify the location where the document is saved and click [Save].
- Confirms the FIX document detail. When it is approved, click [Complete Activities].
When it is not approved, select [Not Approved] and click [Complete Activities].
In this example, [Approved] is set as a default.
- In case of [Approved]
Transit to the next activity and [Document Registration] and [Mail Notification] are automatically completed.
- In case of [Not Approved]
Transits to the [Contract Finalization] activity. [Contract Finalization] is reassigned to the sales personnel A who is an assignee. Perform from the step 17 again.
When the approval is granted, the workprocess is terminated.
This terminates the Workflow sequence of the Applied Type.


 ([Copy] icon) in the [Editing Buttons] area.


 ([Add Attributes from the System Attributes.] icon). Next, click the "Description" for the following activities.


 ([Show Activity] icon) of [Contract Draft].


 [Download] icon.