Basic type
Described below is a simple Workflow connected from the start to the end in line.
Scenario of This Workflow
The assigned user starts the assigned activity and enter the comment.
Next, notify the participants by mail that the activity above is completed.
In the example described here, the Workprocess observer are sales personnel A and legal personnel B, and the Workprocess responsible is Sales Dept. Manager C. Sales personnel A is specified to the assignee of each activity and the Sales Dept. Manager C is specified to the responsible.
Configuration of This Workflow Definition

Creating Workflow Definition
First, create a Workflow definition.
The user performing the workflow activity here needs to be authorized as a definition creator.
Operation
- Enter the URL of ArcSuite Portal in the Web browser.
The [Login] window appears.
- Enter the user name in [Username] and the password in [Password].
- Click the [Login] button.
The [Portal] window appears.
- Click the target Workflow in the [Workflow] area in the [Portal] window.
The [Workflow Top] window appears.
- Click the [Workflow Definition List] link.
The [Workflow Definition List] window appears.
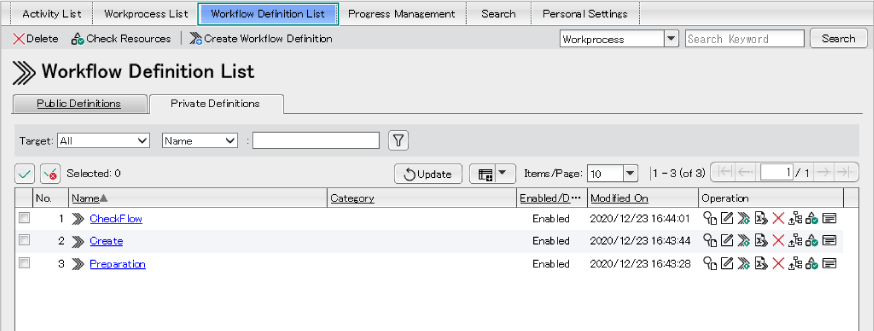
- Click the [Private Definitions] tab and click the [Create Workflow Definition] button in the [Private Definitions] tab page displayed.
The [Create Workflow Definition] window appears.
- In [Definition Name], enter the name of the Workflow definition to be created. (Enter [Workflow: Basic Type] here.) Next, click [Create].
The [Edit Workflow Definition] window appears.
- Settings
Definition Name: Workflow: Basic type
- Select [Basic] from the selecting items in the [Activity] area. Next, select the
 ([Activity] icon) and place it in the [Draw] area using drag-and-drop.
The [Activity] icon is added to the [Draw] area.
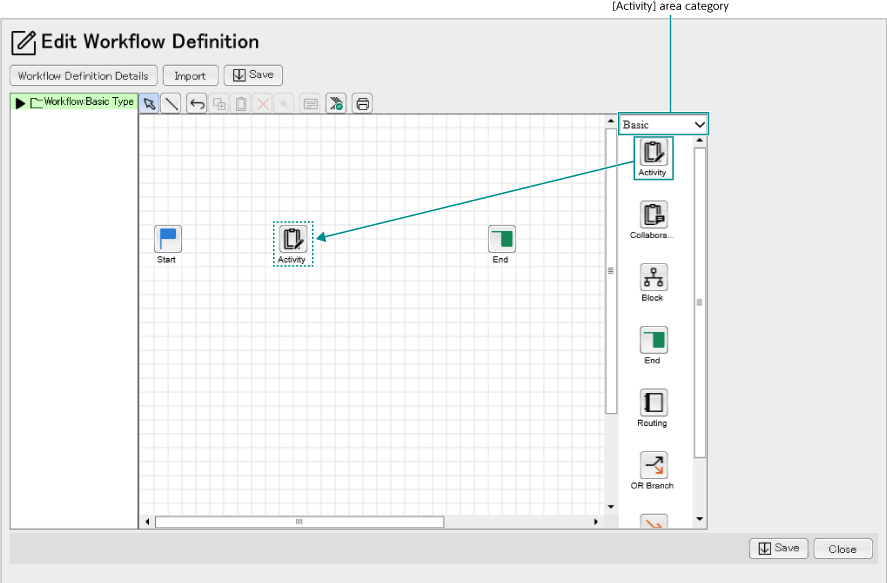
- Double-click the activity name and change it as follows.
- Settings
Activity Name: Contract Draft
Double-clicking the [Activity] icon may not open the window when the activity has too many previous activity and next activities. In that case, click the [Show Details] icon to open the window.
- Select [Application] from the selecting items of the [Activity] area.
- Select the
 ([Notification] icon) and place it in the [Draw] area using drag-and-drop.
The [Mail Notification] icon is added to the [Draw] area.
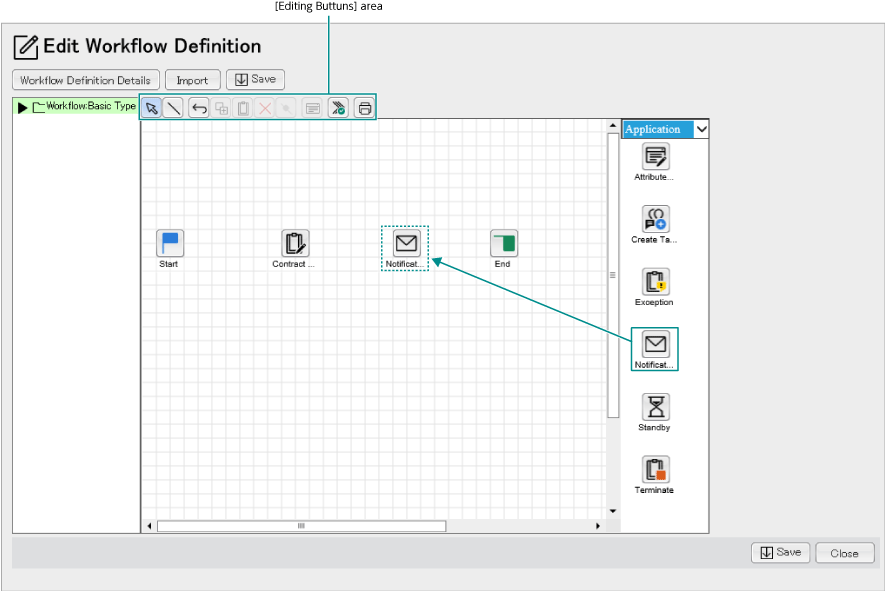
- Double-click the activity name and change it as follows.
- Settings
Activity Name: Registration Notification
Double-clicking the [Activity] icon may not open the window when the activity has too many previous activity and next activities. In that case, click the [Show Details] icon to open the window.
- Select the
 ([Draw Line] icon) in the [Editing Buttons] area.
- Drag the mouse to make a line from the [Activity] icon of the previous activity to the [Activity] icon of the next activity.
Draw lines between [Start] to [Contract Draft], [Contract Draft] and [Registration Notification], and [Registration Notification] and [Terminated].
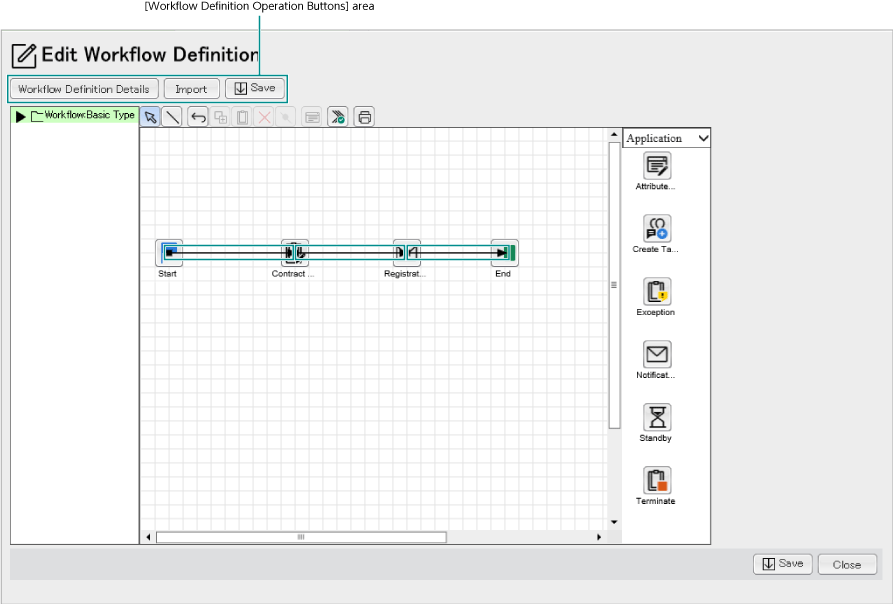
- When a line is drawn by accident or a line needs to be drawn again during operation, click the
 ([Undo] icon) to go back to the condition before the operation.
- When the transition back to the completed activity such as sending back the activity is needed, use the
 ([Add Node] icon) to draw the bent line. ➯ Configuration of this Workflow Definition of the topic [Applied Type] as an example of a loop.
- Click the [Workflow Definition Details] button in the [Workflow Definition Operation Buttons] area.
The [Workflow Definition Details] window appears.
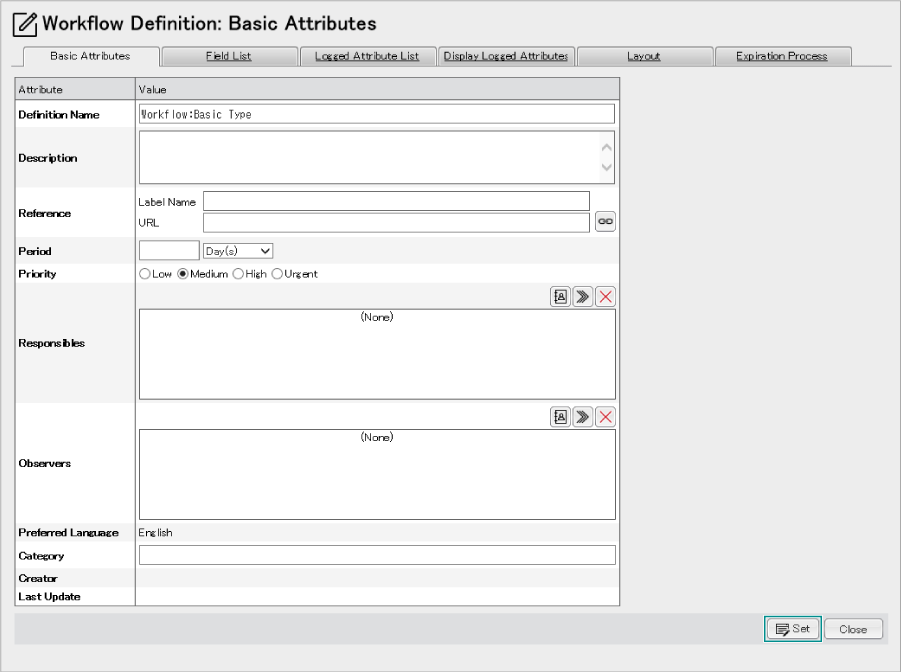
- Specify the users to [Responsibles] and [Observers] in the [Basic Attributes] page.
- Settings
Observers: Sales personnel A, Legal personnel B
Responsibles: Sales Dept. Manager C
- Click the [Set] button.
You will go back to the [Edit Workflow Definition] window.
- Click the
 ([Select] icon) in the [Editing Buttons] area.
- Select [Contract Draft] and click the
 ([Show Details] icon) of the [Editing Buttons] area.
The [Basic Attributes] tab page of [Contract Draft] appears.
The details of the [Activity] icon can be displayed by double-clicking. However, double-clicking may not open the window when the activity has too many previous and next activities. In that case, click the [Show Details] icon to open the window.
- Select [Assignees] and [Responsibles] in the [Basic Attributes] tab page displayed following the procedure of step 16.
- Settings
Assignees: Sales personnel A Responsibles: Sales Dept. Manager C
- Click the [Form] tab.
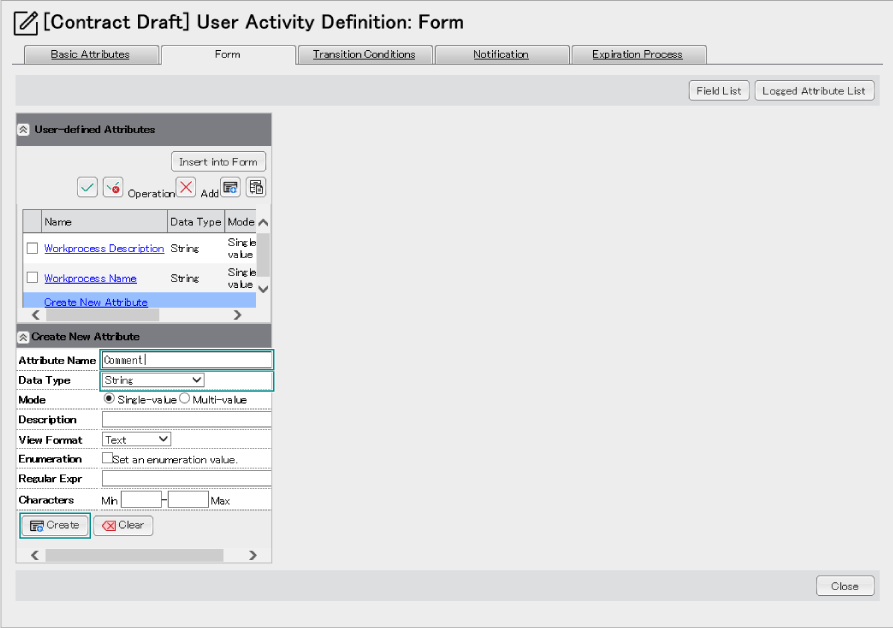
- Click the [Create New Attribute] link in the [User-defined Attributes] area of the [Form] tab page displayed.
- Enter "Comment" in [Attribute Name] of the [Create New Attribute] area displayed. Select [String] for [Data Type]. Select and click the [Create] button.
The [Comment] attributes are added to the [User-defined Attributes] area.
- Settings
Attribute Value: Comment
Data Type: String
- Mark the [Comment] attribute checkbox.
- Click the [Insert into Form] button.
The [Comment] attribute is inserted into the form.
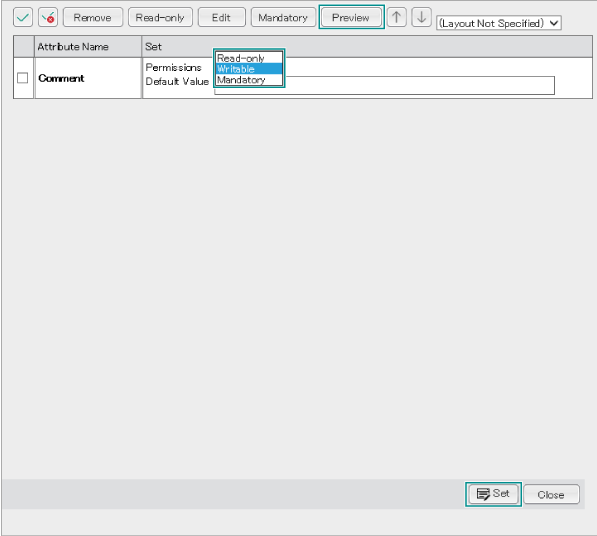
- Select [Writable] in [Permissions] of the [Comment] attribute. Click the [Set] button after setting is completed.
You will go back to the [Edit Workflow Definition] window.
- Read-only
The set comment can be referred to. The user cannot enter the [Comment] attribute in the Form.
- Writable
The user can enter the [Comment] attribute in the Form. The activity can be completed without entering the comment (the warning message will not appear).
- Mandatory
The user can enter the [Comment] attribute in the Form. When the [Comment] attribute is not entered, the warning message appears and the activity cannot be completed.
To confirm the settings, click the [Preview] button.
The settings can be confirmed in the format displayed in the actual form.
- Settings
Permission: Writable
- Select [Registration Notification] in the [Edit Workflow Definition] window and click the [Show Details] icon of the [Editing Buttons] area.
The [Basic Attributes] window of [Registration Notification] appears.
The details of the [Activity] icon can be displayed by double-clicking. However, double-clicking may not open the window when the activity has too many previous and next activities. In that case, click the [Show Details] icon to open the window.
- Select [Assignees] and [Responsibles] in the same way as the step 16.
- Settings
Assignees: Sales personnel A Responsibles: Sales Dept. Manager C
- Click the [Parameters] tab.
Enter the following details in the [Parameters] tab page displayed.
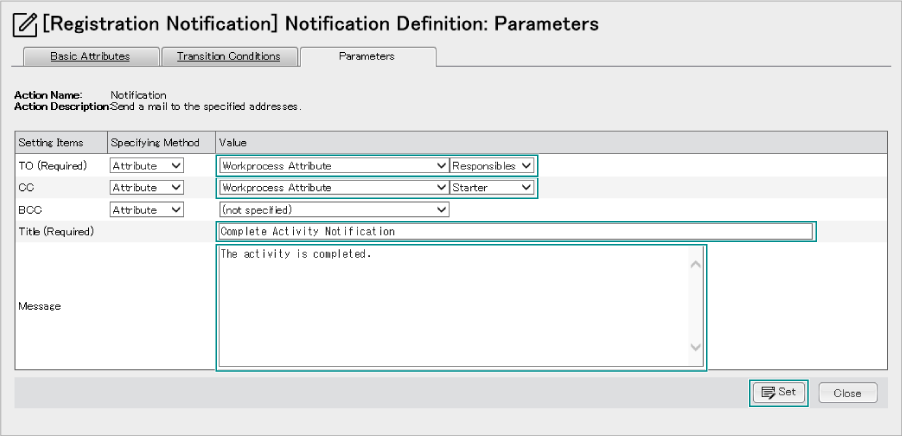
Up to 1000 characters can be entered in the [Message] column.
- Settings
TO (Required): Specifying Method: Attribute Value: Workprocess Attribute, Responsibles
CC: Specifying Method: Attribute Value: Workprocess Attribute, Starter
Title (Required): Complete Activity Notification
Message: The activity is completed.
- Click the [Set] button.
The parameters are set and the window goes back to the [Edit Workflow Definition] window.
- Click
 ([Check Definition] icon).
Check whether or not the flow chart has any errors. Then, the result appears in the [Check Workflow Definition] window.
When the message appears in the error or warning, follow the display to correct the Workflow definition until the message "no problems" appears.
- Click the [Close] button in the [Check Workflow Definition] window.
- In the [Edit Workflow Definition] window, click the [Save] button.
The confirmation dialog box for saving the Workflow definition appears.
- Click the [OK] button.
Click the [OK] button in the [Workflow Definition Saving Completed] window.
You will go back to the [Workflow Definition List] window.
This terminates creation of the workflow definition.
Exporting Workflow
The created Workflow definition can be exported and saved in a file. When editing an existing Workflow, import the saved file. Described here is how to export the "Workflow: Basic Type" created before.
Operation
- In the [Private Definitions] page of the [Workflow Definition Administration] window, click [Workflow: Basic Type].
- Click the [Export] button in the [View Workflow Definition] window displayed.
A dialog confirming export appears.
- Click the [OK] button.
The [File Download] dialog box appears.
- Click [Save].
The [Save As] dialog box appears.
- Specify the location to save the file to be exported. Click [Save] after specifying.
The file is saved in the specified location.
Publishing Workflow
After creating the Workflow, publish it before starting the Workflow.
The user performing the workflow activity here needs to be authorized as a Definition Publisher.
Operation
- In the [Private Definitions] page of the [Workflow Definition Administration] window, click the
 ([Publish] icon) of the definition to be registered in the public area.
The [Publish] window appears.
- Set the following items.
(Click the item name to jump to the comment page.)
- Click the [Next] button.
The [Confirm Publish] window appears.
- Click the [Publish] button.
The [Publication Results] window appears.
The [Public Definitions] tab page allows you to confirm that Workflow is published.
Starting Workflow
Start the Workflow to perform the Workflow activity.
Operation
- Click the [Start Workflow] button in the toolbar of the [Activity List] window.
The [Workflow Definition List] window appears.
Displays the Workflow with the start permission only.
- In the [Workflow Definition List] window, click
 ([Start Workflow] icon) of the definition to be started.
The [Start Workflow] window appears.
- Enter any detail in [Workprocess Name] and [Workprocess Description].

- Click the [Start] button.
When the [User Confirm] dialog box is displayed
- Enter the user ID in [User ID].
- Enter the password in [Password].
- Click [OK].
After the login succeeds, the Workflow is started. When the login fails, an error message is displayed.
The Workflow starts and the [Workflow Starting Results] window appears.
The forms of [Workprocess Name] and [Workprocess Description] displayed in the step 2 are the default forms of [Start]. The form can be added and changed depending on the progress.
➯ the [User-defined Attributes] area for creating the form.
- Click the [Close] button.
Performing Activity (one step within Workflow)
When Workflow is started, activities are assigned to each Assignee.
Then, activity request mail will be sent after the assignment is finished.
Clicking the URL of the activity request mail displays the [Form] page directly.
However, the activity request mail will not be sent in the following cases; a) Mail Notification is restricted by the Workflow Administrative Tool, b) the mail address of Assignee has not been set in the RMS.
Operation
- Click the [Activity List] link in the [Workflow Top] window.
The [Activity List] window appears in the lower frame.
When the [Workflow Top] window appears, the [Activity List] window appears in the lower frame by default.
Nothing appears when there is no assigned activity.
- Select the [Assigned] tab, [Delegated] tab, or [Completed] tab depending on the activities to be listed.
The activities corresponding to the selected tab are listed.
- The sales personnel A clicks [Activity] or
 ([Show Activity] icon) of [Activity] in the [Activity List] window, [Workprocess List] window, and [Task Place] window of CollaboSpace.
The [Form] page of the [Activity] window ([Contract Draft] window in this case) appears.
- Click the [Start Activity] button in the [Form] page.
Now the form is ready to be set.
- Enter any comment in the [Comment] attribute form.

- Click the [Complete Activities] button.
When the [User Confirm] dialog box is displayed
- Enter the user ID in [User ID].
- Enter the password in [Password].
- Click [OK].
After the login succeeds, the [User Activity Completed] window appears. When the login fails, an error message is displayed.
- Click the [Close] button.
- Confirm that the mail is sent to the user specified to the destination with the [Registration Notification] parameter.
When the step 6 is performed, [Registration Notification] is automatically performed. A mail is sent to the destination set in the parameter and [Registration Notification] is completed.
This terminates the Workflow sequence of the Basic Type.


 ([Activity] icon) and place it in the [Draw] area using drag-and-drop.
 ([Notification] icon) and place it in the [Draw] area using drag-and-drop.
 ([Draw Line] icon) in the [Editing Buttons] area.
 ([Undo] icon) to go back to the condition before the operation.
 ([Add Node] icon) to draw the bent line. ➯ Configuration of this Workflow Definition of the topic [Applied Type] as an example of a loop.
 ([Select] icon) in the [Editing Buttons] area.
 ([Show Details] icon) of the [Editing Buttons] area.


 ([Check Definition] icon).
 ([Publish] icon) of the definition to be registered in the public area.
 ([Start Workflow] icon) of the definition to be started.
 ([Show Activity] icon) of [Activity] in the [Activity List] window, [Workprocess List] window, and [Task Place] window of CollaboSpace.